
The LOTRO Spring Festival brings players a whole assortment of activities, from the Hedge Maze in Bree-land to the Shrew Stomping in Duillond. However, in the small village of Brockenborings, Shire, a tipsy task awaits those willing to take on the challenge. Specifically, a Bullroarer’s Challenge! That’s right, everyone’s favorite golf-inventing hobbit is the inspiration for an activity that involves taking a chug of a potent brew and traversing a series of fence obstacle courses while under its effect.
Drunken fence walking is not for the faint of heart, at least for the faint of balance. I will do my best to provide a series of tips to overcome the various Bullroarer’s Challenge courses. However, it ultimately boils down to how well you are able to control your character and camera, and it’s okay if you are unable to complete any or all of the routes. Note that the fences are only available during the Spring Festival – the moment it ends, everything but the platforms go poof. During the course of the festival, you can practice all you want on the fences whether you are on the quest or not, so feel free to skip to any portion of any of the three courses and work out your trouble spots.
— General Tips —
Disabling Post Processing:
Turn off Post Processing Effects (Options > Advanced Graphics > Uncheck “Post Processing Effects”). This will turn off the green double vision, though the disorientation of your character from the center of the screen will remain. It may be a bit cheesy, but it’s effective. I have an older machine, so I tend to play on a lower quality anyways. My eyesight is also quite poor, and that blurry green is a real strain.
Server Stability:
On top of turning off Post Processing, you can also drop down other general quality options if your FPS is chugging along a bit. You definitely want things to be as smooth as possible. If you are experiencing some server lag beyond your control, you might want to wait until things calm down a bit to ensure your movements and jumps are actually registering upon input.
Character Prep:
Character-wise, I’ll tend to position the camera downward a bit more than perhaps usual, so I can focus on the fences and posts. Feel free to cosmetically tone down your character a bit if it helps retain sight on the fencing, such as cloaks, weapons, etc.
Camera Control:
Hold down the right mouse button the entire time while you’re on any of the courses. You want to use the right mouse control to have full command of the camera, and continually orient your character to face forward. Doing so should hopefully reduce the need to control your alignment via keyboard.
Jumping the Shark:
For fences that are connected but have an angle in the middle (shaped like a “V”), I tend to just jump from fence segment to segment rather than stopping at the angle, changing direction, then continuing in the new direction. This results in more of a drunken fence jumping, than walking. Ensure you hold down the right mouse so you can continually change your camera direction to face forward.
Don’t Go Post-al:
When it comes to the fence posts on the North and South course, take your time and don’t try to rush them too quickly in succession. If you find yourself on a weird positioning upon landing on a post, feel free to try very small movements to get more square on the pole. You also don’t need to go post by post – skipping over some can be a bit easier, and will save you the aggravation of trying to land each one. I will outline my individual strategy for taking on those posts below, but ultimately go with whatever feels most comfortable for you.
Quest Efficiency:
After completing the objectives for one of the courses, you can immediately start another one without having to run over to Bullroarer’s statue. Once you complete all four, you can then go over and turn them all in one fell swoop.
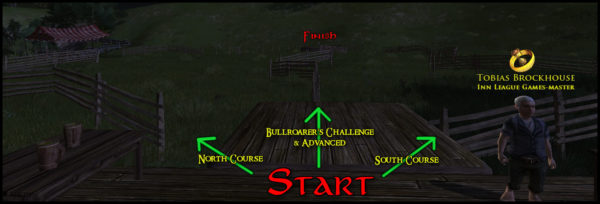
Go straight for the basic course, which includes an advanced speed-run version. South (to the right) is intermediate, and North (to the left) is likely your toughest challenge.
1) Bullroarer’s Challenge / Bullroarer’s Challenge – Advanced
This is the basic fence course, and consists of only fences to traverse. This is a nice primer on holding down the mouse to utilize efficient camera control, as stated in the earlier tips. Pick up the quest and take a swig of the brew (ensure you have an induction bar that starts ticking down before starting). On the first two groups of fences that form a “V”, I like to jump around halfway on the first side of the “V” (basically the first fencepost), and keep panning the camera forward while I’m in the air.
Run forward on the third fence. Be prepared to pan the camera to the right for the second to last fence, and then you’ll need to pan left for the final segment. With forward movement, adjusting the camera toward the angle of the fence should give you a better “runway” for landing your character. Make it to the end and run to the NPC at the end until you get credit for the course.
The advanced version is the same route – you just have less time to make the journey. It’s the same strategy, you’ll just have to be quicker about it. This is especially where jumping the gaps in the first two “V” fences come in handy, as you don’t need to stop in the middle and pivot to make the second half of the fence. Make it to the end and tag the NPC quickly, before the induction ends.
2) Bullroarer’s Challenge – South
I would consider this the easier of the two more challenging courses the developers later added to the game, but the addition of fence posts definitely spice things up. After getting the quest and drinking, you’ll be heading to the course that begins on the right. Again, I face the two “V” fences the same way as before. Once you reach the end of the second fence, you will face your first post. Or not, as you can manage to make the jump from the fence to the next fence, bypassing the post.
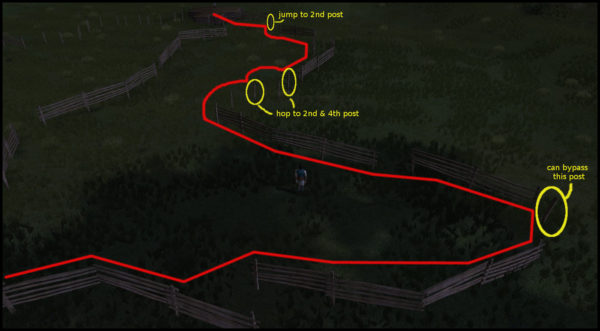
Continue along, and eventually you’ll face four more posts. Here is your first actual test, as you cannot skip these. My technique here is to make the jump from the fence to the second post, then from the second to the fourth, and finally the smaller jump from the fourth to the next fence. Remember to take your time, and you can also make minor adjustments to get centered on a post if you’d like before moving on.
Press on forward, and soon you’ll come to two more posts. Here, I’ll just jump for the second post, and from there to the final fence segment. Make your way to the platform, and ensure you get credit for the completion.
3) Bullroarer’s Challenge – North
Alright, for the big kahuna. This course will definitely test your ability to traverse fence posts, as there are 14 you will face at the very end. Grab the quest, drink the beer, and head left to your final test. The first four fences should be fairly straight forward at this point, if you have handled the prior courses. When you reach the tent at the midway, you’ll also see a taller single post between the end of the fence and the tent, meant to be a stepping stone of sorts. Instead, I ignore this post and will jump straight from the fence up on top of the tent – make sure you have your right mouse held down, run to the end of the fence, and quickly jump and pivot your camera to the right to successfully reach the top.
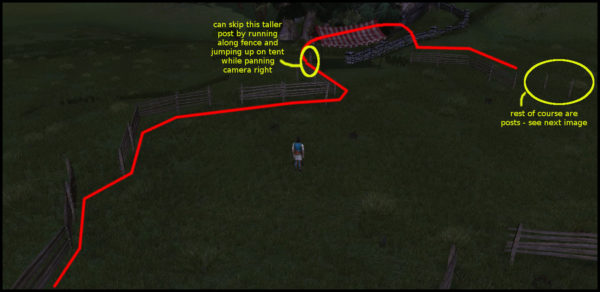
From here, head along the top and you’ll need to jump off the other end of the tent and position yourself to land on the next fence (I think it’s also possible to just drop off the tent if you are standing on the apex and land on the fence, but it could be a tight landing; jumping should get you a better target). Head to the end of the fence, and now you are on the final, tough step.
As mentioned earlier, the only thing between you and the finishing platform are 14 fence posts. It is very easy to make a wrong jump or get a lag spike and miss the next post, sending you all the way back to the beginning of the course. Fortunately, just like you can mitigate the number of posts in the South course, you can do the same thing here. In the image below, I have plotted my strategy for getting through this stage.
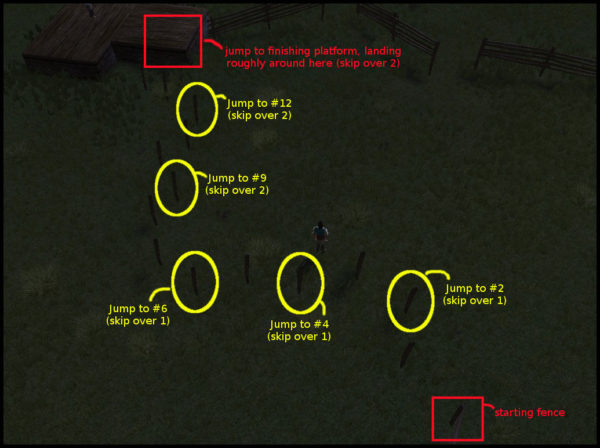
Essentially, it entails in six jumps from start to finish:
*Jump to #2, skipping over one post
*Jump to #4, skipping over one post
*Jump to #6, skipping over one post
*Jump to #9, skipping over two posts
*Jump to #12, skipping over two posts
*Jump to final platform, skipping over two posts (aim to get on as much platform as possible – you’ll likely land right near the corner)
As always, make sure to walk toward the NPC and ensure you got credit for the course.
Turning the quests in to the proper NPC can net you a decent number of Spring Leaves if you decide to pick them as the additional reward for the Advanced, South, and North reward (6 as a total base, or 21 total if you pick all Spring Leaves). There are a collection of other items you can pick, so choose whatever you’d like. The basic Bullroarer’s Challenge does not reward Spring Leaves, but it’s a good source for collecting a stash of Bullroarer’s Brew so you can get the effect all year long. I believe the basic Bullroarer’s Challenge & Advanced are the only two that reward XP (didn’t notice any XP gain on South or North).
If the written guide doesn’t work for you, I also put together a short video running through the three routes. Note I do not have the quests running while running the fences, so your experience may be slightly different (at least for the drunk effect). This is merely just a manner of showing how I mechanically run through the three courses.
As I said before, do not fret if you can’t quite get a grasp of running through the fence running. Most people I see stop by the field just run at least the classic course, and perhaps the Advanced version. Getting a better handle on the other courses takes some practice and muscle memory in the jumps. If you are looking to find a nice, overall guide on the Spring Festival activities, I would urge you to check out Fibro Jedi’s Spring Festival 2019 guide here. Most of all, have fun with whatever it is you are doing in Middle Earth!
Wow, you really made that look easy! I think I have only completed the hardest one once maybe and it took MANY tries! Well done.
Ok, was experimenting again with this today and after about 20 tries on North and South I gave up. My big questions is… Exactly how many tries did it take you to film the smooth/easy looking runs in your videos?!?!?
If I recall, South was actually on the first go (usually anywhere from 1-6ish tries or so?). If you can handle the fences, it really just boils down to three post jumps (understandably tough). It’s annoying falling on the South side, because of running into a quest cooldown (which I don’t think the North side has). If that happens, I just alternate the two quests.
North may have been a different story. Again, if it’s the fence posts in particular that are irksome, you gotta nail five of them in a row (then make the transition to the final platform). I don’t remember the exact number, but it was definitely in the teens. Actually, don’t think I emptied my Recycling Bin yet *checks*.. ok, it was 14 tries before getting it on the 15th.
Sorry on the lack of success, but thanks for giving them the ‘ol college try! Part of my motivation for the video was just to see if I could try out some video capture and editing it together, and the other part was just as a video form of showing off the strategy I end up using that happens to work for me, and maybe it would provide some tips for others. Cheers!